Thursday, December 12, 2013

Factory Tour – Guru Cycles, Part 2: Building a Carbon Bicycle Frame

Factory Tour – Guru Cycles, Part 2: Building a Carbon Bicycle Frame

Guru factory tour - carbon fiber bike construction
In Part One of our Guru Cycles Factory Tour, we showed how the design of the bikes goes from customer order through to a pile of tubes ready for assembly. Mostly, anyway.
Here in Part 2 we’ll finish the process and show how everything comes together to form a complete frame. I’ve seen plenty of carbon fiber bicycle manufacturing in our 5+ years of Bikerumor’s existence. Each time I head to a factory, I wonder what could be new? What could the next builder possibly do that’s different from all the rest. What’s amazing is that virtually everyone manages to surprise, and Guru’s no exception.
First, there’s the unique cut of the carbon swatches that make up the frame. It’s the most visible feature of their Photon bikes and gives it a slick sea snake appearance. Under all that carbon, though, is another very cool construction process I’d not seen before…

Guru factory tour - inside a carbon tube
Guru’s engineers are constantly playing with different layups, seeing what improves the frame, what drops weight and, ideally, what will do both. Their bladder molding process leaves nothing inside except carbon, and this tube shows the patterned layups that help them achieve some incredibly light frames.
Guru Factory Tour - bottom bracket and downtube assembly molds
Most of the Photon’s tubes are made using a silicone bladder. The exception is the downtube/bottom bracket assembly. It’s put together with metal mandrels so they can create a single piece for better strength and stiffness while still getting the tolerances right for pressfit BBs.
Guru Factory Tour - bottom bracket and downtube assembly molds
Interior tabs between the BB shell and downtube add an additional point of contact for a stronger connection once it’s all heated and pressed, fusing the tubes together with a bit more structure. You know what it’s called when someone takes the time to add little touches like these? Love.
Guru Factory Tour - bottom bracket and downtube assembly molds
The layered BB shell wrap is folded over the top (click to enlarge and see the graduated layers), then more Love (carbon tabs) is applied over the sides.
Guru Factory Tour - bottom bracket and downtube assembly molds
The finished product looks like this.
Guru factory tour - carbon bike tubes ready for assembly
Once all the tubes are molded, they’re binned with geometry charts and sent to the middle of the shop floor for mitering, then on to the tacking room:
Guru Factory Tour -frame tacking jigs
This is where everything starts coming together in a recognizable form.
Guru Factory Tour - adjustable carbon dropouts
They also mold their own carbon dropouts, all with tooling made in house. What’s particularly cool about these is they allow for geometry adjustment without resorting to metal inserts. Simple solution to avoid mixed materials; better, lighter weight result.
Guru Factory Tour -frame tacking jigs
With geometry sheets in hand, the jigs are set up to each bike’s specs.
Guru Factory Tour -frame tacking jigs
The tubes are “tacked” into place with epoxy, bonding them together enough to hold their shape during the rest of the assembly process. Here’s where it starts to divert from most other builders.
Guru Factory Tour -frame tacking jigs and putty prep
With many carbon builders, the tubes start to get wrapped with the outer layers of carbon as soon as they’re positioned. Guru, however, is just getting started. First, they paint on a bonding agent leading up to each major joint.
Guru Factory Tour -putty molding compound
That ensures the putty will stay stuck on the carbon during the sanding and shaping process. Wait, what? Putty?!?
Guru Factory Tour -putty molding compound
Yep, all work and no play here at Bikerumor and Guru. Season’s Greetings!
Technically, it’s an epoxy molding compound, and it dries hard as a rock as its baked, which happens immediately after the frame is tacked together. That lets them easily sand and shape it.
Guru Factory Tour -putty molding compound
Lest you worry about an expensive custom bike being weighed down by putty, it only adds about 6g to a finished bike.
Guru Factory Tour -putty molding compound sanded smooth
Once it’s baked, this guy sands off most of it to create shapely tube junctions.
Guru Factory Tour -putty molding compound sanded smooth
Looks good, but it’s not just for aesthetics…
Guru Factory Tour -putty molding compound
Back in the clean room, the bikes are assembled using tube to tube construction. For the Photon series, that nonstructural putty adds functional shape to the headtube junctions. Since they’re only using UD fibers, the broader rounded shapes allow the fibers to be run over a bigger cross section without sharp bends.
Guru Factory Tour - outer structural carbon wrap
Since UD fibers only do their job of stiffening the frames when in tension, this lets them spread forces across a larger area and put the strength in plane with how riding forces are actually acting on the frame. Olivier Lavigueur is the carbon wrapper and has been doing it here for more than five years, and has been at Guru for more than a decade.
Guru Factory Tour - bottom bracket and downtube assembly molds
After the overwrap is complete, a textile called Peel Ply is wrapped over it, then it’s vacuum bagged and put back in the oven to compress and mold the wrap to the frame. As with all carbon construction, the heat and pressure melts the resin between the fibers to effectively turn it into a single, solid piece.  Many of these techniques are borrowed from the aerospace industry, which is a huge part of the Montreal area’s livelihood.
Guru factory tour - frame alignment checks
Between tacking and wrapping, it gets checked for alignment, brake placement and tire clearance. Then it gets checked again when it comes out of the oven for the last time.
Guru factory tour - final assembly state before finishing
If everything checks out, which it almost always does, the frames get sanded to remove the Peel Ply texture (click to enlarge).
Guru factory tour - final assembly state before finishing
They also remove any excess carbon from the insides of the headtube or BB shell to make sure they’re all in tolerance. The holes are cut for the cable stops and bottle bosses. Those parts are pressed or bonded in place, then it’s racked to await paint and final finishing…which we’ll show you tomorrow in Part Three.

Wednesday, December 11, 2013

More Feature Posts Factory Tour – Guru Cycles, Part 1: Office Visit, Carbon Bike Design & Stress Testing - via Bike Rumor

Factory Tour – Guru Cycles, Part 1: Office Visit, Carbon Bike Design & Stress Testing

Guru Factory Tour

For quite some time we’ve been talking to Guru Cycles about visiting their headquarters and factory near Montreal. Following Interbike, we finally made it happen, giving us the opportunity to see close up how they make the amazingly light ~670g Photon HL carbon frame. I even got to ride one, as well as see how they come together from the time you talk to your shop until the time it’s boxed and shipped. And every last bit of the frame is made there in their own facility. Rolls (not tubes, mind you) of prepreg carbon comes in, frames go out, and that goes for all of their carbon bikes, not just the top of the line HL.

They also make titanium bikes, which will be the subject of Part 3. Here, and in Part 2, we’ll show you how the carbon frames are designed, made and tested, along with an overview of their entire operation. Come along, join the ride…


Guru Factory Tour - showroom and workshop

The first stop is the showroom, upstairs from the production floor and adjacent to the offices. One or two iterations of each model sit dressed to impress.

Guru Factory Tour - showroom and workshop

Inside the glass room is their fit studio. If you’re in the area or willing to travel because your own shop can’t do the fit, they’ll be happy to dial you in on their Guru fit device.

Guru Factory Tour - showroom and workshop

Behind the fit station is their workshop, and across the floor is their cafe. Not sure if there’s free coffee for all, but the espressos were flowing when I was there. C’est bon! On the right is the conference room, where we spotted the requisite-for-any-factory-tour prototype sketches:

Guru Factory Tour - prototype drawings and sketches


Guru Factory Tour - design and graphics room

Behind the cafe are all the offices, with sales and customer service taking up the middle space. Above is the graphics department, where they make your wildest (paint scheme) dreams come true. They offer quite a range of colors, but can basically do anything you’re willing to pay for:

Guru Factory Tour - design and graphics room

The Guinness bike was reportedly quite a fun project.

Guru Factory Tour - design and graphics room

Once the graphics for a customers’ bike are finalized, they’re cut and prepped in a bundle and head over to the paint and finishing to await the frame. That’s Jodi, their marketing/PR director and my lovely host for the visit.

CREATING A BICYCLE

Guru Factory Tour - frame specs measurements and geometry layup

The process begins with a good, professional fit from a certified fitter. That’s why they developed their own Guru sizing system, which has since been sold to the Cannondale Sports Group. It’s one small example of the innovation that comes out of this small Canadian company. Another is one of the first production sub-750 gram frames with the original Photon. And the new Photon HL that can come in just under 670g for a stock H1 in size 54 thanks to some trick carbon cutting (you’ll see).
Start to finish, it’ll take about 3-4 weeks to make a Photon. Actual hands on time is at least 20 hours -more for the HL- with a good bit of that time used for drying and curing. Then add a week for delivery.

Guru Factory Tour - frame specs measurements and geometry layup

Once the rider’s measurements, body metrics (weight, height, etc.) and preferences (stiffness, comfort, riding style, etc.) arrive, they’re plugged into Guru’s software. After dropping in the numbers, the system warns of any potential issues like toe overlap. If it’s all clear, they generate three drawings: A rendering to show the customer, a build sheet showing dimensions with the seatpost, stem, fork and other parts, and a geometry chart for the actual frame builders to use. That gets approved, then it generates cut patterns for the carbon and we’re off to the cutting room.

Guru Factory Tour - carbon fiber cutting

Each tube and section of the frame has it’s own specific group of plies.

Guru Factory Tour - carbon fiber cutting

It’s plugged into a router that cuts the shapes from rolls of prepreg. They cut parts to make every bit of the frame, including the tubes. That makes them one of the few brands that actually makes their own carbon tubes in house. They use two different grades of prepreg carbon -standard and ultra high modulus- and control the layup from start to finish.

Guru Factory Tour - carbon fiber cutting

This is one tube. Shapes are cut in exact designs that minimize overwrap where it’s not needed, which saves weight and waste. It makes for much prettier layups, too. They’re cut and stacked so the fabricator can work on a single tube or part at a time.

Guru Factory Tour - carbon fiber cutting

One of the secrets of the HL’s amazingly low weight is the patent pending striped design. The finished tubes look like strips of carbon were laid up over the rest, but in reality strips are removed from the outer layer. Believe it or not, that saves up to 60g per frame, all without sacrificing strength or rigidity. They use this pattern across most tubes on the frame.
They weigh and QC-check each tube and part before molding, after molding and various other times during the process to make sure things are in spec. Each frame supposedly comes out within 5g of target weight before it goes to paint.

Guru Factory Tour - clean room for frame tube assembly

Once cut, the pieces move next door to the clean room where everything’s laid up around latex bladders.

Guru Factory Tour - bladder molds for tube shaping and construction

These are bladders for the headtube and seatstays.

Guru Factory Tour - clean room for frame tube assembly

The bladders are filled with glass beads to give them enough shape to wrap around, then emptied before going into the molds, which are machined in-house out of aluminum. They use aluminum because it’s easier to machine and lighter (easier to carry the molds around by hand – you’d need a lift to move steel molds). Since they’re a comparatively small volume operation, they don’t need the durability of steel molds.

Guru Factory Tour - clean room for frame tube assembly

The exception to that method is the seat tube and bottom bracket, which is what’s being fabricated above. The seat tube and bottom bracket shell are wrapped around a metal mandrel covered by a bag, then wrapped together before going in the mold. This creates a co-molded part with the tight tolerances requires for pressfit bottom brackets.

Guru Factory Tour - downtube and bottom bracket molds

They admit the silicone bladders result in a smoother (near perfect) interior wall, but in order to co-mold the piece the way they do, it required a bag. So, they chose the smallest bag they could that most closely matched the size of the mandrel to reduce wrinkles as much as possible. It’s removed after curing, so all that’s left is the carbon. Taking it out saves about 15g. Yep, I’m just teasing the actual wrap method here – the complete carbon bike construction follows in Part 2. But, we’ve gotta get things ready first.

Guru Factory Tour - molds

While we’re looking at molds, here’s their collection. The ones pulled out are for their TT bike (which was updated at Interbike) and uses a lugged construction method rather than the Photon’s lighter-but-more-labor-intensive tube-to-tube build. The lugged construction lets the parts sleeve together quickly for easier, more price-competive builds.

Guru Factory Tour - molds

This adjustable mold lets them tweak the size of the tube based on the customers’ dimensions. Also made in house, just like all their tooling:

Guru Factory Tour - frame and tube molds

All of the dies and other bits used to craft their frames are machined in house. Having it all under one roof allows for quick testing and development. From the time they develop a concept, it’s on the factory floor being prototyped within a couple weeks. And if they need to change something or want to test an idea, they can machine the tooling or lay it up quickly and integrate it into production within days.

Guru Factory Tour - clean room for frame tube assembly

They have a lot of bladders for different size and type frames.

Guru Factory Tour - clean room for frame tube assembly

The carbon tubes on the left are house-made tubes for a Photon SL, which gets custom geometry but uses “stock” tubes.

Guru Factory Tour - heat press to cure tubes in molds

Once the mold or bagged mandrel is wrapped, it’s inflated to compress the carbon against the alloy mold. Those are clamped together and placed in the heat press. That machine compresses the molds with 20 to 25 tons of pressure, then heats them. Once the temperatures are correct, which is monitored by a computer, air pressure is put in. Both temperature and pressure are ramped up gradually, reaching up to 135 degrees C and 120-130 psi. The whole process takes 30 to 40 minutes for the larger molds, much less for the smaller molds since they heat up quickly. The curing process is customized for each tubeset based on the makeup of the fibers and resin type. Just another example of how they control the process for every bike. Once this process is over, any resin flash is removed, tubes are sandblasted to remove any residue, and they move on to the mitering station. As parts are finished, they’re assembled into a bin for initial tack up, then come back to the clean room for the outer wrap that actually turns the parts into a whole. Again, Part 2.

TORTURE TESTING

Guru Factory Tour - frame testing torture room

Fast forward to the complete frame. Once it’s through production, Guru engineer Nicolas McCrae will occasionally pluck a frame from the line and bring it here to die. They have four different test rigs, which can all be set up with different load cases to test deflection on specific parts of the bike. They can mimic tests used by Asian manufacturers and Tour Magazine, plus their own protocols.

Guru Factory Tour - frame testing torture room

This bike was being tested for front triangle flex. McCrae built it up normally and tested it to pass. Then he added a couple layers of strategically placed (he wouldn’t tell me where – top secret R&D and all) high mod strips of carbon and increased front triangle stiffness by 30% for a weight gain of just 2%.

Guru Factory Tour - prototype downtube carbon layup for testing

He also tests prototypes and new layups. This woven pattern did well, but isn’t practical from a production standpoint. Or at least that’s the story McCrae’s sticking to. There were some other ones we couldn’t photograph.

Guru Factory Tour - frame testing torture room

Ultimately, the physical tests are done to verify the computer simulations and virtual designs.
The other side of the equation is the torture testing, shown on the right. Their machine simulates 100,000 left/right pedal revolutions with a 1,100 Newtons of force (242 pounds) on each side. So, that’s like a 240lb person putting 100% of their weight and 100% of their effort riding routinely for years. McCrae said it’s far more load than any bike will see in the real world. He adds in a short burst of 1,700 Newtons for 4,000 cycles (375 pounds) just for fun, too. He says if a frame passes the first 4,000 cycles, it’ll likely last a couple million cycles. All of their bikes, even the insanely light Photon HL, pass the test easily.

Monday, November 25, 2013

3rd Annual Cranksgiving Ride 2013 - Friday November 29th 10:30am

3rd Annual Cranksgiving Ride  - Fri Nov 29th 10:30am


The ride starts from the store and rolls at 10:30am for a 30mile no-drop ride through southern Anne Arundel County.  Please remember to bring a non-perishable food item as a donation to the County Food Bank.

The GPS directions for the route can be found here: http://ridewithgps.com/routes/3704761  You can also print out maps and cue sheets from that same link.


See you on Friday!


Tuesday, November 19, 2013

How can Mirinda Carfrae run a 2:50 marathon in Hawaii Ironman, but you can’t?

Because she’s a very fit and gifted runner and triathlete, unlike most others! Simple and true.  The blog below was written by Sami Inkinen, 4th place in the Ironman 2013 World Championships M35-39 with a sub 9hr race.  He also crushed the 2013 Eagleman 70.3 race winning the amateur race in 4hrs 5mins.

image
This could be your body at Hawaii Ironman triathlon.

However, there are a few fundamental factors that change the limits of endurance performance at the Hawaii Ironman triathlon significantly and thus make certain athletes much more likely high performers in such conditions. Having just raced at that event the 7th time and seen many write-ups about “optimal pacing in Hawaii” or “how much slower you should expect to go in Hawaii” type of articles, I thought it would be interesting to look at the very specific reasons why Hawaii is different and why race pace recommendations based on “averages” is quite useless.

Human endurance performance is limited by many factors, many of which are still debated and whether it is our brain (=the central governor theory) or our failing peripheral muscles (=the cardiovascular model) that slows us down to our maximum sustainable speed. However, it is widely agreed that extreme heat and humidity negatively affect performance at maximum efforts. Interestingly, heat and humidity doesn’t slow down much if at all in the swim and bike portion of triathlon, which I’ve personally experienced and race simulation research in heat shows that too. So something different happens during the run.

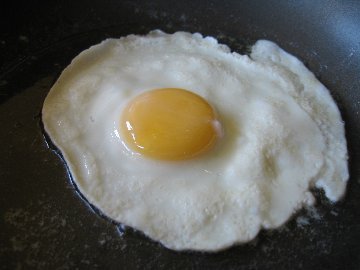
Our bodies and brain try to avoid the destiny of eggs on a hot frying pan and there are two key factors pushing us away and towards this homeostasis while running:
    image
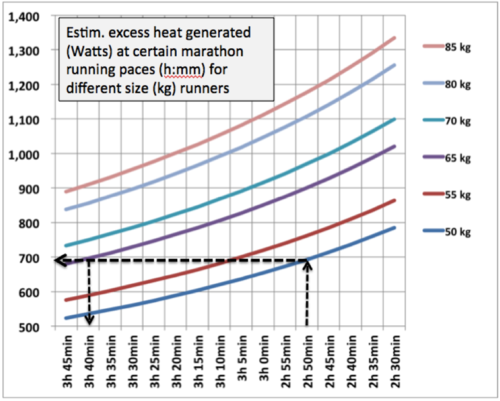
    Wasted heat production (in watts) at certain marathon running paces for athletes of different sizes (weight, kg). Assumes that heat power equals 80% of the total energy metabolized for the movement.
  1. Heating power that is the result of our human inefficiency. For every 1000kcal we metabolize, we only use about 200kcal (or 20%) to the forward moving motion. The rest is wasted as heat. (Roughly the same applies to cycling too, a cyclist pushing a bicycle forward at 300 watts is actually generating more than 900W of heat in addition to that forward moving power) Interestingly the energy cost of running is independent of our running pace. It takes about 1kCal per body kg to run 1km, regardless of running pace or body size. The consequence of this is that the heating power rapidly increases as you run faster and as you add weight.
    As an example, a 50kg person running a 2:50 marathon “only” needs to get rid of 750Watts of continuous heating. Meanwhile, a 65kg person can only run a 3:40 marathon at the same waste heat level. Fortunately, our bodies can get rid of some of the excess heat, so heat doesn’t always become the performance limiter.
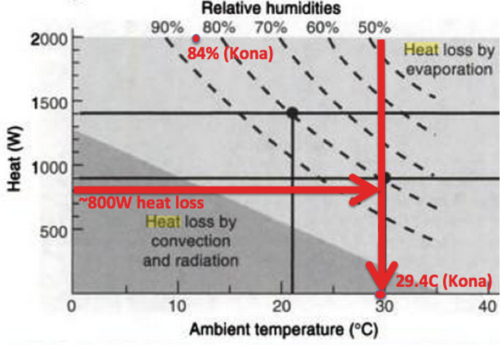
  2. Cooling power that is primarily a function of convectional cooling and sweat evaporation (not just sweating) from skin. Unfortunately cooling power does not increase at the same rate with excess heat production, as cooling is more closely related to human skin surface area than weight. Secondly, cooling is also very sensitive to ambient temperature and humidity.

    So the bad news is that at some running speed, runners should theoretically hit the point at which heating power exceeds cooling power, (soon) after which our bodies either shut down or turn into eggs on a frying pan. This almost never happens in cycling - unless climbing a very steep hill at walking/running pace - because at 20-40mph speed the cooling effect easily exceeds the extra heat generated.
The best approximate for body cooling during running I could find was in Tim Noake’s Lore of Running, in the following chart, which seems to assume strong air flow at max running speeds (about 5min/mile) and large skin surface area (about 75kg athlete).

image

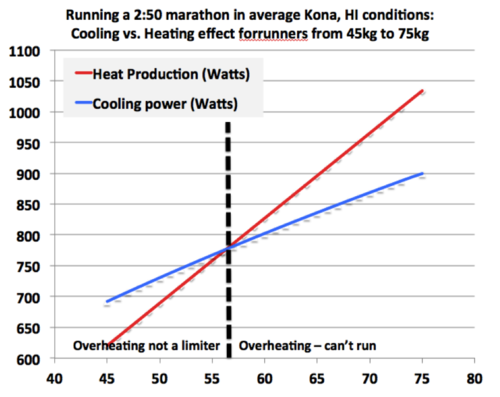
Considering the average weather in Kona, HI in October is 29.4C and 84% humidity and stays at a remarkable narrow band over the years, I estimated what happens if you run at 2:50 marathon pace in these conditions by using Noakes’ cooling model and adjusting it based on body size (skin area):


image

 It looks like a 55-60kg (120-130lbs) runner is not going to be limited by heat for a 2:50 marathon, but anyone larger than that will suffer and overheat at that pace based on average athlete’s heat loss (cooling ability).

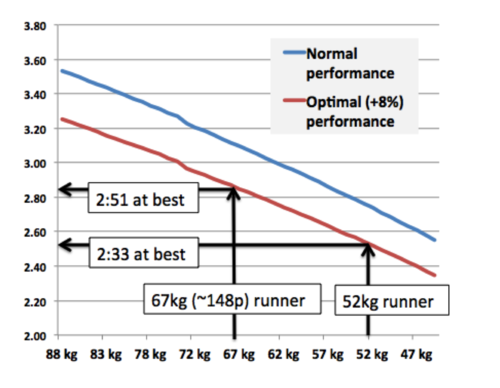
So the obvious question is how fast can a runner of size X run in the Kona, HI conditions. Based on the above assumptions and also including a +8% heat acclimatization factor that has been show at least in some studies,  I came up with the following:
image
Estimated best possible marathon performance in Hawaii Ironman based on heat as the limiting factor for different size runners.
 
From the above chart, if you dream of running a sub 3hr marathon in Hawaii, you shouldn’t be larger than about 72kg (or 160 pounds). For reference, the 2:50 marathon women’s record holder weighs about 52-53kg and many of the top men in the 60-65kg range for this event.
So what’s the take-away for someone racing in Hawaii Ironman and hoping to run really fast?
  1. Unless you’re very small (under 55-60kg) heat is likely going to be a significant performance limiter on the marathon run (not bike or swim) assuming you’re well trained to run fast otherwise.
  2. Acclimatize and cool as much as you can on the run.
  3. Hope for a cool and windy day on the run.
  4. Watch someone like Mirinda Carfrae (52kg) run really fast every time despite the weather conditions in Kona.
Final note: This analysis was hacked together pretty quickly and I’m quite sure there are missed nuances and potential errors in my interpretation of research data. So use it at your own risk (and entertainment).

Wednesday, November 13, 2013

Inside the Data.....Ironman Florida 2013: Allison LaRochelle

In the first of this series we look at the power data from Parvilla Cycle & Multisport Elite team member Allison LaRochelle from her Ironman Florida 2013 race.    Allison is coached by Parvilla Cycle & Multisport's Iain Banks.

Having done her first half-ironman in 2012,  this year was spent increasing the volume and importantly learning to train and race with her power meter.  Allison uses the Stages Cycling power meter on her custom Guru CR.901.

On race day Allison raced with her Guru CR.901 and Zipp 404's, with aero helmet.  Her bike split for the 112miles was 5hrs 37mins.  Weather conditions were almost perfect with little wind on the flat course and moderate temperatures.

What Allison was able to do was to settle into her power strategy and concentrate on that as opposed to getting caught up in the race of the other 2,500 people on the course.  As you can see from the power data the keys to success were:

Click for larger image
  • Great pacing set her up for a great result. She put out 128 watts for the first half, then maintained 120 watts for the second half.
  • Allison limited her time in the red zone and stayed steady all day. Other than some early small spikes, she kept her power in check. Her Variability Index, or VI, was only 1.06, showing that she never pushed too hard.
  • Generally many female Ironman power files show a lower cadence.  Allison was able to keep her cadence at 80 rpm for Florida.
  • Even with the lower watts over the 2nd half of the bike, Allison was able to negative split the course and come home 3mins quicker than the first half.
  • Allison's overall intensity was a near perfect 69%.  For front of pack age groupers, esp. first time ironman athlete's, this is a great balance of pushing hard enough but also saving something for the run. 


Click for larger image

 Allison finished off her great day with a 4hr marathon and a finishing time of 11hr 01mins....16th in age group.


Monday, November 4, 2013

Ironman Florida 2013 - A day of fist fights, smiles, and compression socks!


Ironman Florida 2013 - A day of fist fights, smiles, and compression socks! 

- The account of first time Ironman Allison LaRochelle

Since I started competing in triathlons a couple years ago after having my second son, Brady, an Ironman has always been on the bucket list.  And one year ago after racing my first Half Ironman, I decided to take the leap and sign up for Ironman Florida.  Being a Miami native, nothing was more appealing to me than sun, sand, and flat roads.  And so started my journey of training for my first full Ironman - I had my coach, my sponsors, Parvilla Cycle & Multisport, Guru Cycles, Pactimo & Retul, I had focused the 2013 season on this race. Now it was time!

What to say about Panama City Beach, Florida.  Other than the beautiful water and white sandy beach, the town itself leaves a bit to be desired.  To paint you a little picture, there are more strip clubs than Starbucks and we were lucky enough to have the “Show & Tail” Gentleman’s Club across the street from our condo.  But I wasn’t there to be out on the town so no big deal. :) We headed down to the Expo through a sea of compression socks, and checked in.  I have never seen so much compression gear in my life – I actually felt like the odd ball for not having it on.  Triathletes are a funny bunch. 
The Show-N-Tail "attractions" of PCB!

Coming into the race, my biggest concern was the bike leg.  I hadn’t been able to fit in many long rides, which had me very unsure about what was about to be my longest ride to date. The swim and run portions have always been my favorite disciplines so I wasn’t too concerned there.  That is until Thursday, when a front was moving through which gave way to some pretty rough seas for a practice swim.  It was insane trying to get out through all the waves. After fighting my way through the waves for a bit I decided to pack it up and body surf my way back in.  Cue the start of nervousness about the swim.

 Friday, the day before the big race, was even worse with very strong winds and the Gulf was so rough that they put out double red flags for no swimming allowed.  Cue more stress about the swim. The day before a race is always full of butterflies and nervousness for me and this time it was no different except amplified by about 100%!  So many questions go through your head: Have I trained enough?  Why couldn’t I just have done a couple more long rides?  What if the water doesn’t calm down?  Is it too late to go home?  Have I trained enough?  Have I trained enough?  Have I trained enough?  :)  Paul and I went out for my pre-race dinner of sushi and then back to the condo for an early bedtime.  Not a wink…that’s how much I slept the night before the race.  But finally it was time to get this show on the road and head down to transition!

After getting my gear together we all headed down to the beach to start.  This year they had self-seeding corrals which basically means you stand on the beach in between signs that signify how long you think it will take you to finish the swim. Everyone still starts at the exact same time, which basically means it is still a mass start of 3500 people running in and diving through the waves at the same time.  I started with my self-seeded group which was on the inside of the pack, closest to the buoys.  I thought I was prepared for the chaos of a mass start, but I wasn’t even close!  It is an all out brawl where grown men actually try to drown you!  No one cares that you are in a pink cap, they actually put their hands on your head and back and push you under.  Elbows are flying, fists are punching, people are cursing at each other in between gasping for air and trying not to drown.  It is complete mayhem.  I consider myself a good swimmer and this was the closest I have ever come to thinking I was going to drown.  About 300 yards out I had swallowed so much water and been punched and pushed under so many times I had a bit of a panic attack.  I screamed and tried to float on my back and regain my composure but it was useless.  I was completely boxed in by thousands of people and there was absolutely no way out. I thought of Paul’s friend who was a Navy SEAL and realized he wouldn’t just float here screaming like a little girl, he would fight like hell and keep moving forward.  So that is what I decided to do.  It wasn’t until the first turn buoy that I was able to finally get in a couple full strokes of free style and try to find my own little box where I could actually swim.  I knew I was getting close to finishing the first loop when a big wave crashed down on me and knocked my goggles off.  Phew, goggles back on and I made it through the first loop. A quick look at my watch pleasantly surprised me with 31 minutes despite my breakdown and all the fighting! I was psyched.  I ran across the beach and headed out for loop two.  This time I only took one big blow, which unfortunately was right on my watch so I was sure it had stopped my timer, but other than that I was able to get into a rhythm and just enjoy the swim and feel proud of myself (and a bit silly) for having recovered from my little episode on the first loop.  Finally I was done! 1hr 5mins! I had finished and had lived to tell about it.  I ran out of the water and looked to find that my watch had been smashed. Actual pieces of it were missing and it was completely broken.  Of all days to not have a watch!  But, it is what it is so I ran into transition and off for the bike. 

I was feeling great!  Even though I didn’t have my watch, I knew I had a good swim.  Once on the bike all I had to do was stick to the plan.  I had my power zones planned out and I just had to fight the urge to go with the people that passed me. I kept reminding myself that this was going to be a long ride so I didn’t want to burn all my matches this early.  Something I learned– this race is a draft fest!  I can’t even tell you how many groups of 6-12 people flew by me all drafting off each other.  It actually got a bit discouraging because even though it was tempting to jump on, it is against the rules and I wasn’t going to do it.  I did not want to be sitting in the Penalty Tent cursing myself and getting me out of a positive frame of mind.  It was fun to see a group of about 10 people who had flown by me around mile 70 all sitting in the penalty tent a little further up the road though.  I love when Karma works its magic :). The bike was pretty uneventful and I was so happy because I was feeling great!  I stuck to the power plan and ate and drank way more than I usually do in training and it was working.  Even though I didn’t have a watch I could see from my computer that I had a bike split I was really pleased with. Time for the marathon!

Smiling, high-fiving....Ironman's are fun right?

A quick change to my running shorts and gear and I was off – running “naked” as they say, without a watch to give me any indication of how I was doing time wise.  In a way I think this was a very good thing.  I ran completely by feel and didn’t have any added stress of looking down and thinking I was going too fast or too slow.  And I couldn’t tell anyone’s age group anyway because their calves were all covered with compression socks!  I felt terrific and so started a long run with my plan to walk every single water stop to make sure I stayed hydrated.  The crowd support during the run is unbelievable!  The aid stations have people dressed in costumes cheering like crazy and blasting music.  They make you feel like you are a rock star the way they cheer for you.  It was so much fun!  Around mile 9 I asked a man that had a Garmin how we were doing on time and he informed me that if we kept up this pace we were on target for a sub-11 hour finish time.  WOW, this was exciting news.  While I tried not to put too much pressure on myself to finish in a certain time, I was really hoping for a sub-12 hour race, so this was happy news!  It gave me plenty of cushion for the second loop because I had a feeling I wasn’t going to be able to keep this pace up the whole time. I told him thanks and that I liked his compression socks and kept running.  :)

What a great day to run a marathon

The first loop was done before I knew it and I was still feeling happy but definitely hurting a bit more.  All that liquid and gel throughout the day wasn’t doing my stomach any favors.  I forced down gels as few more times until I finally couldn’t take it anymore.  Thank goodness for the Pepto I had with me because I was eating those things like candy.  Around mile 15 I decided to switch to coke at the aid stations to help settle my stomach.  This was also the time I pulled out my note that Brock made me before the race “Go Mom Go.” That was all I needed to just keep moving forward.  I thought of quotes that friends gave me before the race, and I made Diana Nyads mantra of “Find a Way” my own.  No matter what I was going to find away.  The miles just kept clicking by and before I knew it I was at the 20 mile mark. My calves were cramping up very badly by now so at this point I started to stop and stretch them from time to time (Damn these people and their compression socks!). I knew I was slowing, but I was feeling really good for being 20 miles in and was still able to stick to my plan of only walking the water stops.  Around mile 23 I was in disbelief that I only had 3 miles left and I hadn’t had any moments of self doubt or feeling like I just couldn’t finish.  I also had no clue what time it was so I had no idea how close I was to breaking 11 hours.  I just wanted to keep moving forward.  Once I hit 25 miles, which was really close to our condo, I started to get excited. I stopped for one last drink and then picked up the pace a little.  A few people started running by me really fast but I didn’t think anything of it.  Hindsight is 20/20 and now I know why they were in such a hurry. When I could hear the finish line I picked it up a bit more and was running harder but feeling good. 

Allison LaRochelle - You are an IRONMAN!

Finally I was there running down the chute.  I was completely alone so I heard my name announced clearly and I was in total shock to see that my time was 11:01:32.  I was so happy and so proud of myself.  I still can’t believe what I just accomplished.  And you know what the first thing I did was?  Yep that’s right, put on a pair of compression sleeves with my flip flops!  Maybe there is something to these things after all :)

Although I am ecstatic with my race and my time, it is hard to quiet the “what if’s” when you are only 2 minutes from breaking 11 hours.  What if I hadn’t had my little melt down in the water? What if I hadn’t taken my time in transitions?  What if my watch had kept working and I could have known just how close I was, maybe I could have skipped that last aid station or not stretched my calves so much at the end?  I have thought of about a million things I could have done differently to get that extra 2 minutes back.  But at the end of the day, who really cares?  It the grand scheme of things, it really doesn’t matter.  I had a perfect day for me.  It was one of those rare days when everything felt good and I was just happy. I was smiling all day, high fiving little kids, thanking volunteers, and encouraging everyone I passed.  I had Paul there cheering me on and was able to give him a great big hug at the finish. That’s really what it’s all about in my opinion.  Having fun, being happy, and being so grateful for being able to do this kind of thing. 

And now, I am officially an Ironman!!!!  :)